
Introduction
It's been said that premature optimization is the root of all evil, but when your specialty is supposed to be web development, having anything less than a perfect 100 Lighthouse performance score might be considered unacceptable.
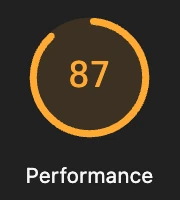
Imagine my embarrassment when I realized that this very blog only received a disappointing 87 Lighthouse performance score 🫠.
This obviously could not stand. This post outlines the performance optimization steps I used to get this site's Lighthouse performance score to where it should've been all along.

Checklist
Before going into too much detail, here is a high-level checklist of the performance optimizations applied to this website:
- link rel="preconnect"
- link rel="dns-prefetch"
- link rel="preload"
- webp image format
- img srcset
- img loading="lazy"
- img decoding="async"
- css minification
- js minification
- defer script tags (reverted)
- increase max-age of cache-control headers
- http2 (NGINX proxy)
More details are provided below.
Preconnect
<link rel="preconnect" href="https://devsteve.com">This is an HTML resource hint that tells the browser to perform the DNS lookup, TCP connection, and TLS handshake ahead of time. This means that when the resource is actually needed, the connection is already open, leading to faster fetches.
DNS Prefetch
<link rel="dns-prefetch" href="https://devsteve.com">This tells the browser to scan the page for external domains (e.g., cdn, fonts, etc.) and proactively resolve the domain names to IP addresses in the background, using minimal resources. The resolved IP is cached, so when the user clicks a link or the browser needs a file from that domain, the time-consuming DNS step is already done, saving milliseconds.
It should be noted that this site does not currently load any third-party fonts/scripts/assets, so this tag probably wasn't needed.
Preload
<link rel="preload" href="../../css/main.min.css" as="style">
<link rel="preload" href="../css/blog.min.css" as="style">
<link rel="preload" href="../css/post.min.css" as="style">
<link rel="preload" href="../../js/main.min.js" as="script">
<link rel="preload" href="../js/post.min.js" as="script">
This is an HTML feature used to tell the browser to download critical resources needed for the current page earlier in the loading process than it would otherwise discover them. This improves page performance and user experience by ensuring that essential assets, such as fonts, images, and scripts, are available when the page is ready to render
WebP Images
WebP offers better compression, making image files ~30% smaller than JPEGs/PNGs for faster websites, better SEO, and less bandwidth, while supporting both lossy/lossless quality, transparency, and animations, effectively combining the best features of JPEG, PNG, and GIF into one modern, versatile format.
Not all of the site's JPEG and PNG files have been converted to WebP, but all new assets will be uploaded as WebP images going forward.
Image srcset
<img src="/blog/assets/images/fe-perf.webp"
  srcset="/blog/assets/images/fe-perf-small.webp 400w, /blog/assets/images/fe-perf-medium.webp 600w, /blog/assets/images/fe-perf-large.webp 800w"
  alt="Banner Image"
  class="banner-image"
  loading="lazy"
  decoding="async" />
The srcset attribute in HTML allows you to provide a list of potential image sources to the browser, which then selects the most appropriate image based on the user's device capabilities, such as screen size and pixel density. This results in improved performance and a better user experience by serving smaller, faster-loading images to mobile devices while ensuring high-quality images on large, high-resolution screens.
Image Lazy Loading
Lazy loading images defers the loading of the image until it reaches a calculated distance from the viewport. This is the recommended value for images that are "below the fold" (not immediately visible when the page loads).
Include width and height attributes to help the browser reserve the correct space, preventing layout shifts (Cumulative Layout Shift, or CLS) as the image loads.
Image Async Decoding
Normally, the browser might load and decode all resources, including images, synchronously on the main thread before presenting the full page. If an image is large, this decoding process can cause a delay in rendering the rest of the page, making the UI appear slow or frozen
Asynchronous decoding gives the browser permission to decode the image on a separate thread, off the main one. The browser continues to render the rest of the page content, and the image pops in once its decoding is complete.
CSS Minification
This is an obvious one that I just hadn't got around to doing. The CSS and JavaScript files used by this site are already quite small, but since every byte counts, I've started using the venerable Grunt to handle CSS minification.
JS Minification
Similar to CSS minification, this site now uses Grunt for JS minification. Why Grunt? Well most of this site is built with vanilla HTML, JavaScript, and CSS, and it turns out Grunt still works great for this type of setup.
The content of this site's Grunt file is provided below.
module.exports = function (grunt) {
  grunt.loadNpmTasks('grunt-contrib-uglify');
  grunt.loadNpmTasks('grunt-contrib-cssmin');

  grunt.initConfig({
    uglify: {
      targetMain: {
        files: {
          'public/js/main.min.js': ['public/js/main.js']
        }
      },
      targetMainWorker: {
        files: {
          'public/js/app.worker.min.js': ['public/js/app.worker.js']
        }
      },
      targetBlog: {
        files: {
          'public/blog/js/blog.min.js': ['public/blog/js/blog.js']
        }
      },
      targetBlogPost: {
        files: {
          'public/blog/js/post.min.js': ['public/blog/js/post.js']
        }
      },
      targetFootballAnimation: {
        files: {
          'public/blog/js/football-animation.min.js': ['public/blog/js/football-animation.js']
        }
      },
      targetLab: {
        files: {
          'public/lab/js/lab.min.js': ['public/lab/js/lab.js']
        }
      },
      targetPictureGame: {
        files: {
          'public/lab/picture-game/js/script.min.js': ['public/lab/picture-game/js/script.js']
        }
      },
      targetPictureGameWorker: {
        files: {
          'public/lab/picture-game/js/app.worker.min.js': ['public/lab/picture-game/js/app.worker.js']
        }
      }
    },
    cssmin: {
      options: {
        mergeIntoShorthands: false,
        roundingPrecision: -1
      },
      targetMain: {
        files: {
          'public/css/main.min.css': ['public/css/main.css']
        }
      },
      targetBlog: {
        files: {
          'public/blog/css/blog.min.css': ['public/blog/css/blog.css']
        }
      },
      targetBlogPost: {
        files: {
          'public/blog/css/post.min.css': ['public/blog/css/post.css']
        }
      },
      targetLab: {
        files: {
          'public/lab/css/lab.min.css': ['public/lab/css/lab.css']
        }
      },
      targetPictureGame: {
        files: {
          'public/lab/picture-game/css/main.min.css': ['public/lab/picture-game/css/main.css']
        }
      }
    }
  });

  grunt.registerTask('default', ['uglify', 'cssmin']);
  grunt.registerTask('build-css', ['cssmin:targetMain', 'cssmin:targetBlog', 'cssmin:targetBlogPost', 'cssmin:targetLab', 'cssmin:targetPictureGame']);
  grunt.registerTask('build-js', ['uglify:targetMain', 'uglify:targetMainWorker', 'uglify:targetBlog', 'uglify:targetBlogPost', 'uglify:targetFootballAnimation', 'uglify:targetLab', 'uglify:targetPictureGame', 'uglify:targetPictureGameWorker']);
};
Script defer (reverted)
Adding the defer attribute to an HTML script tag can be used to specify that the script should be downloaded in parallel with HTML parsing but its execution is deferred until after the document has been fully parsed. This approach is a modern best practice for performance optimization, as it prevents the script from blocking the browser from rendering the page's content.
Unfortunately due to the way some of the site navigation JavaScript was written (thanks, Claude!), adding the defer attribute to the script tags seemed to create some glitchy UI behavior. Fortunately the site still scores a perfect 100 Lighthouse performance score without utilizing this performance best practice.
Increase max-age
Lighthouse had complained that an 8 hour max-age was too short, and suggested increasing the amount of time the browser is told to cache frontend assets. Increasing the cache-control header's max-age to 1 day seemed to resolve the Lighthouse warning.
HTTP/2 (NGINX Proxy)
I guess I've been living under a rock for the past several years, but I didn't realize the Express Node.js framework doesn't support HTTP/2.
Of all the proposed workarounds, I ended up configuring an NGINX proxy to handle the HTTP/2 connections with the web clients, and proxy the requests back to Express which still uses HTTP/1.1.
A sample NGINX config is provided below.
server {
  listen 80;
  server_name devsteve.com;
  # Redirect HTTP to HTTPS
  return 301 https://$host$request_uri;
}

server {
  listen 443 ssl http2;
  server_name devsteve.com;

  ssl_certificate /path/to/ssl/cert;
  ssl_certificate_key /path/to/ssl/key;
  ssl_session_cache shared:SSL:10m;
  ssl_session_timeout 10m;
  ssl_protocols TLSv1.2 TLSv1.3;

  location / {
    # Proxy requests to the Express.js app
    proxy_pass http://localhost:8080;
    proxy_http_version 1.1;
    proxy_set_header Upgrade $http_upgrade;
    proxy_set_header Connection "upgrade";
    # Forward important client information
    proxy_set_header Host $host;
    proxy_set_header X-Real-IP $remote_addr;
    proxy_set_header X-Forwarded-For $proxy_add_x_forwarded_for;
    proxy_set_header X-Forwarded-Proto $scheme;
  }
}
Conclusion
Admittedly if you use a modern frontend framework many of these optimizations might be included by default.
If you're a weirdo like me who still likes to play around with vanilla browser-supported HTML, JavaScript, and CSS, then I hope some of the tips in this post help you improve the performance of your own web projects.
As always, please feel free to comment below.
Comments
There are no public comments at this time.